This comprehensive guide provides a step-by-step tutorial on containerizing a .NET application with docker on google cloud. The article dives into the practical aspects of creating a .NET application using Google Cloud Shell, setting up Docker, and building your container images.
Prerequisites: This would be hands on tutorial, and you can follow along with free Google Cloud credits. Learn more about google free tier account here Google Cloud Free Credits – Google Cloud Tutorials .
Table of Contents
Create .NET app Using Google Cloud Shell
Login into Google cloud console and in project selector page click on projects and click on create new project.
Note: Google cloud free tier account provides credits worth 300$ that can be used to learn and explore gcp services. To make best use of free credits its always best option to create new project for new POC’s and once your work is done project can be deleted to delete all dependent services. This would help minimize costs.
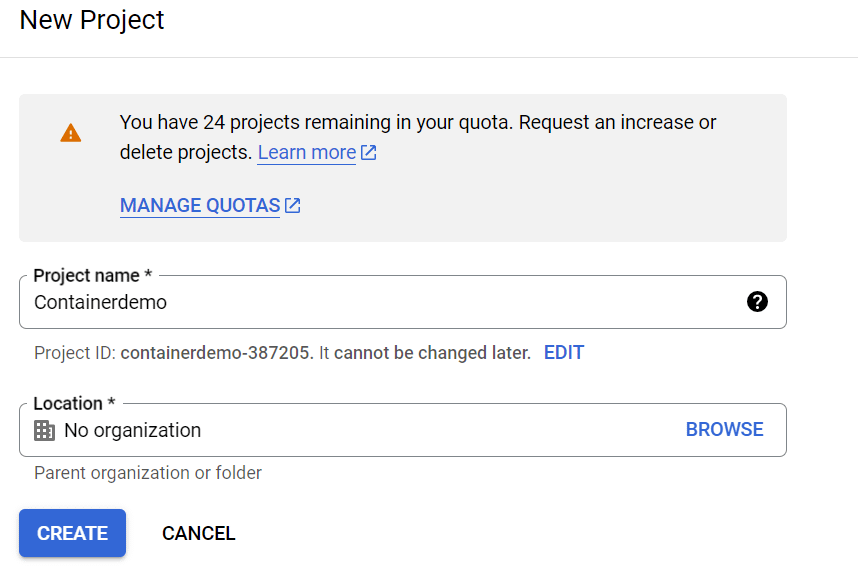
Enter valid project name. Free tier account users can create maximum of 24 Projects.
individual accounts would not have Organization and it is only valid for enterprise accounts.
It would take some time for your project to set up in google cloud. Once the project is ready, navigate to the new project.
Activate Google Cloud Shell
To Containerize .NET 6 application development machine should have .NET 6 SDK and Docker installed.
Google cloud platform offers online development machine (cloud shell) that has Docker and .NET 6 pre-installed.
To activate cloud shell Search for cloud shell in google cloud console. Select cloud shell editor. This would provision a new VM instance in the cloud.
This VM instance would be all .NET 6 SDK and Docker pre-installed.
Create an empty .NET 6 project using below CLI command.
dotnet new mvc --framework "net6.0" -o DotNetContainerDemoThis will create an empty project with name “DotNetContainerDemo” in cloud shell Virtual machine. Project directories and folders are visible in cloud shell editor.
Before creating Docker image App must be published.
Navigate to Project Directory and Publish the application using the below command.
dotnet publish -c ReleaseThis will build the application and compiles your app to the publish folder.

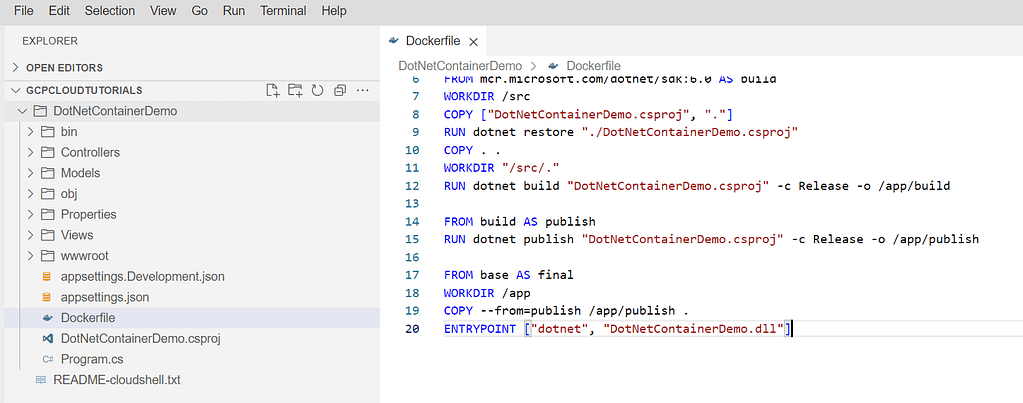
Set up the Docker file
- Log into cloud shell and navigate to the project explorer view.
- All projects created using Google cloud shell are visible in this view.Search your project based on project name and explore project directories and folders.
- Add a new file at project level and name it as “Dockerfile” and click on save
- Copy paste below code into docker file. Update project name as per your projectname in Docker file.
Dockerfile is normal text file, and it doesn’t have any extension.
FROM mcr.microsoft.com/dotnet/aspnet:6.0 AS base
WORKDIR /app
EXPOSE 8080
ENV ASPNETCORE_URLS=http://*:8080

FROM mcr.microsoft.com/dotnet/sdk:6.0 AS build
WORKDIR /src
COPY ["DotNetContainerDemo.csproj", "."]
RUN dotnet restore "./DotNetContainerDemo.csproj"
COPY . .
WORKDIR "/src/."
RUN dotnet build "DotNetContainerDemo.csproj" -c Release -o /app/build

FROM build AS publish
RUN dotnet publish "DotNetContainerDemo.csproj" -c Release -o /app/publish

FROM base AS final
WORKDIR /app
COPY --from=publish /app/publish .
ENTRYPOINT ["dotnet", "DotNetContainerDemo.dll"]
Dockerfile will be used by Docker to build container Image. All instructions inside docker image will be executed step by step to create image layers.
To create custom image for our application we would need base image.
Project created in step 1 targets .NET 6 framework hence we need to use .NET 6 Base Image.
The FROM keyword requires a fully qualified Docker container image name. Microsoft container registry hosts publicly accessible container images.The dotnet segment is the container repository, whereas the sdk or aspnet segment is the container image name. The image is tagged with 6.0, which is used for versioning.
Copy command tells Docker to copy the specified folder from your Virtual machine to a folder in container.
WORKDIR changes the current directory inside container to app.
ENTRYPOINT tells Docker to configure container to run as an executable.
The directory structure of the working folder should look like as below.
To build custom image from your terminal, run the following command:
docker build -t custom-image -f Dockerfile .Docker build command build Docker images from Dockerfile.
Execute this command in same Project Directory.Dockerfile must in root directory of the project as shown above,
Docker will line by line process each instruction specified in Dockerfile.The -f switch is the path to the Dockerfile.
This command builds the image and creates a local repository named custom-image that points to that image.
To display list of all docker images execute below command..
docker images
The 217MB is the size of Image. A minute ago, is image creation time stamp. The latest tag is used to identify the image.
Create and Run Containers using Docker on Google Cloud
Docker provides docker create command to create a Docker container.
docker create --name core-custom custom-imageIt will create container based on cutom-image. Output shows containerid of the newly created container.
To check list of all containers, use below command.
docker ps -a
Container is created with a name “core-custom”.Use below command to start the container.
docker start core-customTo check only running containers use below command.
docker psStop Docker Container
docker stop core-custom Docker also Provides docker run command to create and run the container in a single command. Port ‘8080’ of the container is mapped to port ‘32767’ of the host.
docker run -p 32767:8080 custom-imageGoogle cloud platform offers Google Kubernetes Engine Google App engine to run containers in Google cloud.
Learn More Deploy Microservices On Google Kubernetes Engine (GKE) In 8 Easy Steps – Google Cloud Tutorials
Learn More Run Containerize App In Google Cloud App Engine – Google Cloud Tutorials
FAQ
What are containerized applications?
Containerized applications are applications that run in isolated runtime environments called containers. Containers encapsulate an application with all its dependencies, including system libraries, binaries, and configuration files. This all-in-one packaging makes an application portable by enabling it to behave consistently across different hosts—allowing developers to write once and run almost anywhere.
What are benefits of containerization?
Resource and operational savings.
Portability of containers for cross-platform development
Easy to scale.
How are containers different from virtual machines?
The primary difference is that containers virtualize operating systems (OS), not the underlying hardware, while VMs virtualize physical hardware through a hypervisor.
Further, every VM has access to a guest OS’s full copy, as well as the application and its dependencies. However, a container only packages the application, its libraries, and dependencies.