Step by step tutorial on GCP Artifact Registry to learn how to create, push, and pull Docker images seamlessly.
What is artifact Registry Google Cloud?
Google cloud artifact registry also known as next generation container registry is fully managed service used to store container images and non-container artifacts.
Enterprise application teams needs to Manage more than containers in software development life cycle. You can store multiple artifact formats including OS patches and language packages like Python, Java and Node.
It extends existing capabilities of container registry like customer managed encryption keys, PUB SUB notifications and provides better security, scalability and control. It acts as uniform control pane for containers, OS and language repositories.
In container registry access control is at repository level and not at object level. Artifact Registry allows you to have more fine grain access control using cloud IAM.
Unlike container registry artifact registry support creation of regional repositories which allows you to store data in the same locations that it would be used ensuring high availability and faster speed.
Prerequisites:
A Google Cloud Platform (GCP) account – If you don’t have one, you can opt-in for a free trial. Refer our tutorial Google Cloud Free Credits – Google Cloud Tutorials.
This will be a hands-on demonstration and you can follow along.
Create a private Docker repository in Artifact Registry
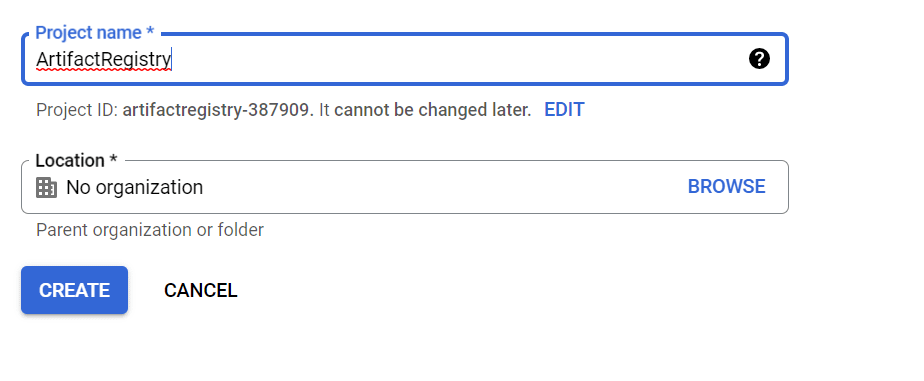
1.log into Google Cloud console, navigate to project selector page, select or create a new project.
Note: Google Cloud free tier offers credits worth 300 $ to explore and learn GCP. To make most of this it is always best option to utilize cloud services and resources more effectively. If you don’t plan to keep resources for long than you can create a new project in GCP to explore artifact registry and once, you finish you can delete this project to remove all resources associated with the project.
2. Check and ensure billing is enabled for your Google Cloud project.
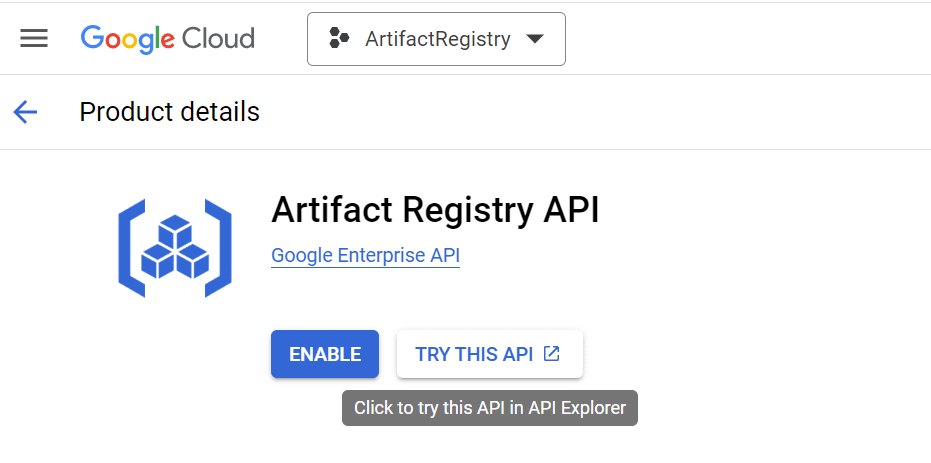
3.Activate Artifact Registry API.
Activate Cloud Shell
Google Cloud shell provides development environment to develop, build and deploy applications.
It comes preinstalled with the gcloud, docker, and kubectl command-line tools and other utilities.
In Google cloud console and search “Cloud shell”
Click the Activate Cloud Shell button at the top of the Google Cloud console window.
Create a Docker repository
Open the Repositories page in the Google Cloud console.
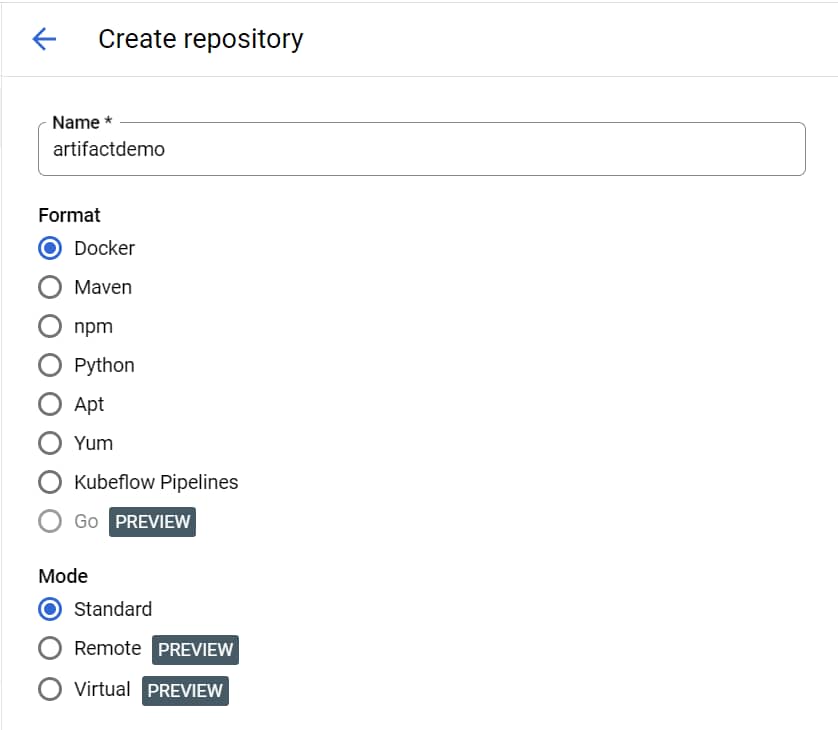
Click Create Repository.
Specify artifactdemo as the repository name.
Choose Docker as the format and Standard as the mode.
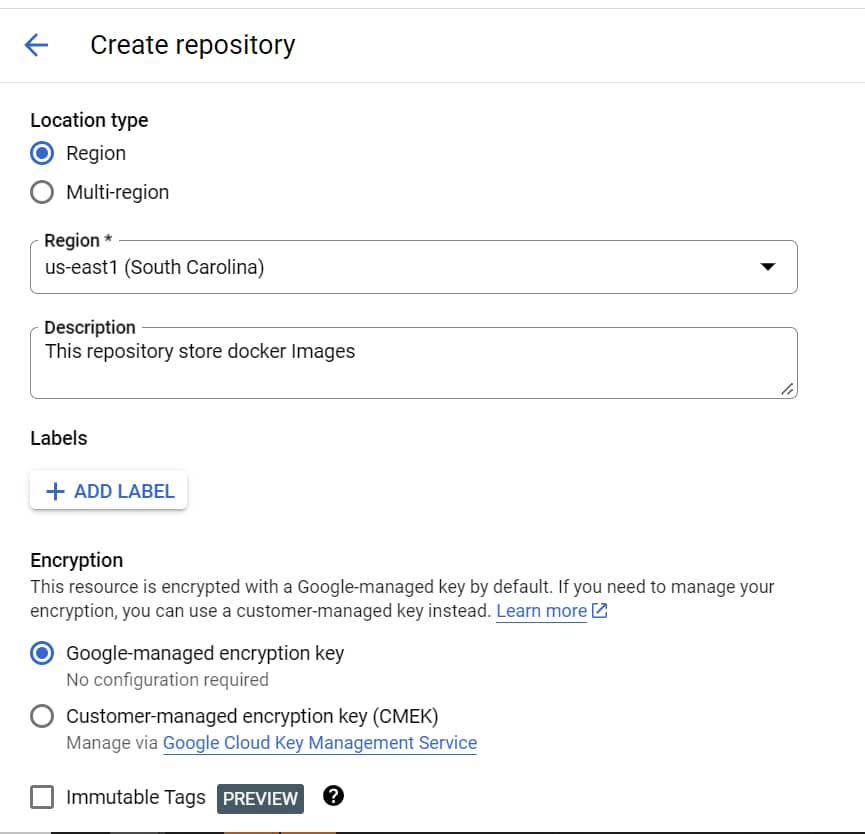
Under Location Type, select Region and then choose the location us-central1.
Add description and click on create
Create an image to push
Create a .NET 6 empty project using below CLI command.
dotnet new mvc --framework "net6.0" -o containerdemoPublish the application using the below command.
dotnet publish -c Release
Set up the Docker file
In the cloud shell editor, navigate to the project explorer view and create a new file at project level and name it as “Dockerfile”.
FROM mcr.microsoft.com/dotnet/aspnet:6.0 AS base
WORKDIR /app
EXPOSE 8080
ENV ASPNETCORE_URLS=http://*:8080

FROM mcr.microsoft.com/dotnet/sdk:6.0 AS build
WORKDIR /src
COPY ["containerdemo.csproj", "."]
RUN dotnet restore "./containerdemo.csproj"
COPY . .
WORKDIR "/src/."
RUN dotnet build "containerdemo.csproj" -c Release -o /app/build

FROM build AS publish
RUN dotnet publish "containerdemo.csproj" -c Release -o /app/publish

FROM base AS final
WORKDIR /app
COPY --from=publish /app/publish .
ENTRYPOINT ["dotnet", "containerdemo.dll"]
Dockerfile is a text file, and it doesn’t have any extension. It is used by Docker to build and create a container image.
In this article you have create an empty project targeting .NET 6 framework. Dockerfile uses .NET 6 base image from Microsoft repository to create application container image.
Navigate to project folder using below command.
cd containerdemoBuild the Docker Image
docker build -t artifact-demo -f Dockerfile .run docker images to see a list of images installed:
docker images
Push container images to google cloud artifact registry
Before you push the Docker image to Artifact Registry, you must tag it with the repository name.
Tagging the Docker image with a repository name configures the docker push command to push the image to a specific location.
docker tag artifact-demo \
us-east1-docker.pkg.dev/artifactregistry-387909/artifactdemo/artifact-demo:V1
docker tag artifact-demo us-east1-docker.pkg.dev/disco-serenity-412905/artifactdemo/artifact-demo-v1us-east1 is the repository location.
docker.pkg.dev is the hostname for the Docker repository.
PROJECT is your Google Cloud Project Id
artifactdemo is the name of the repository.
artifact-demo is the image name you want to use in the repository. The image name can be different than the local image name.
V1 is a tag you’re adding to the Docker image. If you didn’t specify a tag, Docker will apply the default tag latest.

Docker image is now ready to be pushed to artifact registry.
Before you can push or pull images, configure Docker to use the Google Cloud CLI to authenticate requests to Artifact Registry.
To set up authentication to Docker repositories in the region us-central1, run the following command:
gcloud auth configure-docker us-central1-docker.pkg.dev
To push the Docker image, run the following command:
The command updates your Docker configuration. You can now connect with Artifact Registry in your Google Cloud project to push and pull images.
docker push us-east1-docker.pkg.dev/artifactregistry-387909/artifactdemo/artifact-demo:V1Pull the image from google cloud artifact registry
To pull the image from Artifact Registry onto your local machine, run the following command:
docker pull us-east1-docker.pkg.dev/artifactregistry-387909/artifactdemo/artifact-demo:V1
Refer our article to Deploy Container Images on Google Kubernetes Engine Deploy Microservices On Google Kubernetes Engine (GKE) In 8 Easy Steps – Google Cloud Tutorials.
Clean up Resources
To avoid incurring charges to your Google Cloud account for the resources used in this tutorial, either delete the project that contains the resources, or keep the project and delete the individual resources.
Artifact Registry pricing
Detailed pricing on artifact registry Pricing | Artifact Registry | Google Cloud .
What is the difference between Google Container Registry and artifact?
Artifact registry supports container images and non-container artifacts while container registry only support container images.
Artifact registry supports regional repositories while container registry supports only multi regional repositories.
Artifact registry allows more fine grain control access using cloud IAM compared to container registry.
Artifact Registry has its own pricing. Users are charged for storage and network egress.
What types of artifacts does Artifact Registry support?
Artifact Registry supports various types of artifacts, including Docker images, Maven packages, npm packages, and Python packages.
What are the key features of Artifact Registry?
Features may include versioning of artifacts, fine-grained access control, vulnerability scanning for container images, and integration with popular build tools.
How do I authenticate and control access to Artifact Registry?
Access to Artifact Registry is controlled through Google Cloud Identity and Access Management (IAM). You can define roles and permissions to control who can access and perform actions on artifacts.
How does Artifact Registry integrate with other Google Cloud services?
Artifact Registry seamlessly integrates with other Google Cloud services, such as Google Kubernetes Engine (GKE), Cloud Build, and Cloud Run, making it easy to incorporate artifact management into your CI/CD workflows.